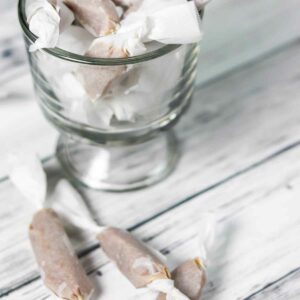
Homemade Salted Caramels
Creamy, buttery, rich taste, deliciously soft and chewy. They melt in your mouth and taste incredible – so much better Homemade Salted Caramels take some time, but result in a perfect candy and are great for gifts!

Many moons ago I was navigating some food blogs I read religiously.
I came across this fun list of recipes on one blog that had be jumping from blog to blog.
Turns out, that was the Secret Recipe Club and their first reveal.
I was taken by the idea of getting paired in secret with another blogger, and choosing something from their blog to make.
Then coming together as a group on reveal day and sharing what we had made from our secret partner’s blog. Sounds fun, right?
It went on for a lot of years. It was a huge part of my blogging back then.
Well, today we’re having a little “throwback” fun. I have missed the stuffing out of those ladies, and all of our banter and fun that we had.
They became like family and oh how sad I was on our last reveal day.
But today, we are having a Secret Recipe Club reunion and I am SO excited!
So for our reunion, I was paired with Sid’s Sea Palm Cooking. A blog I am very familiar with.
I had a very hard time deciding what to make based on her awesome recipe index.
There were so many delicious things I’d like to try, like a gorgeous Blackberry Jam Trifle.
Or oh goodness, these Spicy Stuffed Mushrooms.
Then I landed on her sweet section and I finally chose these Homemade Caramels because I have been wanting to try some new recipes to find a really good keeper. (I found it!)

Can we just talk about these amazing Homemade Salted Caramels for a moment?
Creamy, soft and chewy and wonderfully buttery.
You can tell they are homemade, they almost melt in your mouth, unlike their storebought counterparts.
Don’t let the recipe fool you. They are actually VERY easy.
They take time. They take almost an hour on the stove if you go that route, or you can cut that time down drastically using the microwave.
I have included instructions for both. That way you can choose how you want to make them.

I also expirimented with the corn syrup. The original recipe called for light corn syrup, but Sid used dark.
I actually made a batch with both to see which I preferred. Trust me, Sid knew what was up.
Dark is WAY better than light, but it truly is up to you.
The recipe isn’t that different, just the dark provided a richer, deeper flavor.
I also chose to add a teaspoon of vanilla to the mix at the end.
This is up to you as well.
I tried a batch with and a batch with out and found that I liked it with better. Again, both tasted fine, just better with.

If you’ve never made candy before, this is the recipe to try it with.
Sid kept hers just straight up caramels, but I made half of my batch into these Homemade Salted Caramels.
I used a rose sea salt and a regular sea salt. You can choose any sea salt or course salt you’d like.
Crushed nuts are great on top. Or fill the bottom of the pan with nuts and pour the caramel over the top.
This caramel is also GREAT for dipping apples, using with ice cream and much more.
I hope you decide to whip up a batch of these Homemade Salted Caramels, because I think you will love them too!

More Easy Candy Recipes:
- Spiced Peanut Brittle
- Halloween OREO Candy Corn Bark
- Dark Chocolate Peanut Butter Macadamia Truffles
- Gingerbread Peanut Butter OREO Cookie Balls
- Peanut Butter Pumpkin Bites
- Honey Lemon Ginger Throat Drops
Printable Recipe for Homemade Salted Caramels
Homemade Salted Caramels (or without salt)
Ingredients
- 1 cup butter
- 1 cup granulated sugar
- 1 cup brown sugar
- 1 cup dark corn syrup (yes you can use regular, but we found dark to have a nicer flavor)
- 1 cup sweetened condensed milk we used Eagle Brand
- 1 teaspoons vanilla if desired
Instructions
In the microwave:
- In at least a 2 quart microwave safe dish glass dish, melt the butter (took about 1 1/2 minutes in my microwave). When butter is melted, add the rest of the ingredients.
- Microwave on high for 2 minutes and then stir. The mixture will be nice and foamy. Microwave another 2 minutes and stir it again. This is SO hot, so be careful when removing from the microwave to stir.
- If you want really soft caramels, you could just remove them now and let them set, but I will let you know they are VERY soft and runny even when they set up. I recommend microwaving 2 minutes, stirring and then maybe even another 1-2 minutes and stir.
On the Stove:
- In a large pot over medium heat, add the butter, both sugars and corn syrup. I don’t recommend using a non-stick pan, because for some reason they just don’t seem to get the ingredients to the caliber they need to be by the end.
- Stir over medium heat until mixture begins to boil, about 5-10 minutes. Stir often. Like almost continuously. You want to be careful not to burn the mixture at all.
- Add the sweetened condensed milk a little at a time while stirring constantly. You’re making sure the mixture stays a constant boil so the caramels don’t curdle with the added milk.
- Stir the mixture constantly, you don’t want to stop and sometimes having someone else around to help makes a huge difference. Trust me your arm will get tired. Be sure and scrape the sides occasionally until it reaches firm ball stage (about 240 degrees F on a candy thermometer). You should also try it the old fashioned way – simply drop a spoonful of hot caramel sauce into a cup of ice water and then mold it with your fingers into a ball. It should roll nicely but also be firm and set up. That’s how you know you have the correct stage.
- One your caramel hits the firm ball stage (240 degrees F), remove from heat. Stir in a vanilla if desired.
When ready to Set:
- When you’ve cooked it long enough, pour the caramel into a buttered pan (we use a jelly roll pan) (or use parchment paper to line the pan which makes clean up a breeze) and let it set up. If you want to speed up the setting, you can put them in the fridge for a couple of hours. I did it for about 2 hours total.
- If you want to sprinkle your caramels with sea salt or course salt, do this before they set. You can also use crushed nuts, sprinkles or whatever you like. I used a pink sea salt, and also a rose flavored sea salt I’ve been saving.
- When it’s set, use a pizza cutter or a sharp knife and slice the pieces the size that you want.
- Once you have them cut to the size you want, cut up pieces of parchment paper, roll up the caramels into the parchment paper, twist the ends and you’re ready to go. They make a great gift!


I would love to have a pound of these! It would be just for me, no sharing. Making caramels is on my “got to do” list. Yum….thank you for sharing.
I have always been nervous making candy… the thought of sugar burns has me freaked out. But this recipe looks doable!!
Great SRC choice
These caramels look perfect! Great SRC pick!
I would love to be gifted some homemade caramels for Mom’s day. Caramels are one of my favorite candies.
I love homemade caramel! I need to try making some with my flavored salts now.
Thanks for the kind words, and wow you made them on top of the stove? I’ve only ever made them in the microwave. I’ve added salt to the top before and also used this to make home made turtles as well. So glad you liked the recioe. This has been a fun reunion.
What a great pick. I always struggle with caramels, and these look divine!
These look delicious Nicole! I’ll take mine with salt and vanilla please! =)
I have never been comfortable with making candy – soft ball, hard ball all freaks me off. Those home made caramels just look so perfect, and home made is always the best… we know what is in it and also can flavor it our way. Would love to try the microwave version…
caramels are the best! These look great and remind me of the holidays when my mother in law makes giant batches.
Don;t these look lovely? yum!
Salted caramels are a favorite of mine! I love your use of rose sea salt.
Oh. My. GAWD.
Those caramels look WICKED CRAZY GOOD, in exactly the best way!
So sorry it took me a week to get here…I so enjoyed the SRC reunion, and miss everyone!
Wow…these caramels have turned out perfect. Simply awesome! My whole family loves salted caramels.
Yes! I have dark corn syrup in my pantry from last fall when I bought it accidentally and haven’t known what to do with it. Perfect. Great SRC post.
I have never been comfortable with making candy – soft ball, hard ball all freaks me off. Those home made caramels just look so perfect, and home made is always the best… we know what is in it and also can flavor it our way. Would love to try the microwave version…
Wow…these caramels have turned out perfect. Simply awesome! My whole family loves salted caramels.