Cheesy Garlic Pull Apart Bread
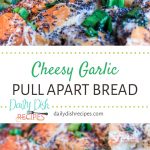
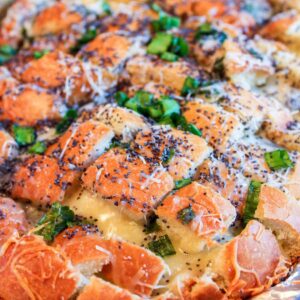
A beautiful Cheesy Garlic Pull Apart Bread – easy to make, tastes like a burst of heaven in your mouth and goes great at even the most elegant event. Melted buttery cheese between slices of Italian bread topped with green onions and poppy seeds. Add herbs with the cheese.

I am only a little in love with pull apart bread. A little. That’s funny. I could eat this all the time. It’s really that good.
So I’ve seen pictures running around on Pinterest for Pull Apart Bread. And from the first time I laid eyes on it, I knew it was something I would make.
Have you ever tasted something, immediately closed your eyes in a bit of food ecstasy and remembered a time a long time ago when you had that same flavor? A food memory.

It is strangely reminiscent of something I had when I was much younger. Only better. Much better.
There were way too many recipes running around for me to follow one. So I just looked at all the things other people did and made it my own.
We made this with store bought bread the first time. The second time and every time there after, I made it with homemade Italian bread from a recipe I found a few years ago online. I will be sharing that soon. I will tell you that Cheesy Garlic Pull Apart Bread is fantastic with either bread, but there was definitely something better about the homemade bread. Imagine.

The hardest part of the whole thing is getting the cheese stuffed way down inside. The best part of the bread is changing up the ingredients and making variations of it. (some of those coming very soon!)
And making variations is ALL we have been doing. I think I have a pull apart bread problem. haha
Here it is, all ready to go into the oven.

Ready to make your own Cheesy Garlic Pull Apart Bread?

Nom, Nom. I want some right now as I write this post, and there isn’t any. Guess I know what I’m making again today.
Happy Monday friends!
Cheesy Garlic Pull Apart Bread
Ingredients
- 1 loaf Italian Bread
- ½ cups butter melted
- 2 Tablespoons garlic minced
- 4 Tablespoons green onion diced, divided in half
- 2 cups swiss cheese shredded
- 2-3 Tablespoons poppy seeds optional
Instructions
- Preheat your oven to 350 degrees F.
- In a bowl, combine the hot melted butter, garlic and diced green onion, stir and allow to sit for just a minute or two.
- Slice the bread in a crisscross pattern – do not cut all the way through – just to about the bottom inch or so of bread.
- Slowly pour the butter mixture into the crevices of the bread. If you have a very large loaf of bread, you can add some more butter or add olive oil to the mixture to make it go further. (about 1/4 cup). It goes pretty far though, so you should be okay with the original recipe, pour slowly to cover the most.
- Stuff shredded cheese down into the crevices. It's fine to have some sticking out, but really try to push the majority down inside the crevices. Start at one end and work your way across the loaf.
- Sprinkle the poppy seeds across the top of the entire loaf.
- Add the rest of the diced green onion.
- Wrap the whole loaf in tinfoil and place on a baking pan.
- Put in the oven for about 15 minutes.
- Remove and unwrap foil. Pop it back into the oven for another 5-10 minutes or until cheese is melted through.
- Remove from oven and serve. You just pull the little pieces right out of there.


wow Nicole, I was drooling over the picture you tweeted last night, but seeing all of the pictures and reading about that amazing bread has my tummy growling before lunch! I’m going to have to try to find a gluten free bread that will do this recipe justice! Wonderful recipe!
Oh goodness it’s one of my favorite additions to dinner. I have to watch how often I make it because I am not good at controlling myself LOL
I hope you find a good gluten free bread so you can try it too. Thank you! xxx
I’m in love with this pull apart bread! Everything that is good and glorious in this world (butter, cheese and carbs!) in one amazing package. Your photos are gorgeous, Nicole – I’m drooling over each one.
I love how you think – everything that’s good and glorious in this world. You are not kidding.
Thank you so much for the sweet compliment!
I just want to like.,…shove my face in there and devour! It’s not very lady like, but oh soooo delicious!
lol Kayle, I sort of felt like that when it came out of the oven. I really do get it. haha Thanks!
I make something just like this but with sourdough bread (my fave) and monterey jack cheese, it is one of my FAVORITE recipes in my repertoire, and one of my most popular on the site. Your photos are making me drool; what a beautiful loaf! I totally understand your love for pull-apart cheesy bread.
I could live off of this bread, and this bread alone. Gotta love cheese stuffed carbs. Yum!
Baking and finger food all rolled into one. Does it get any better than that?
I love baking over the weekends and this is a recipe that I definitely need to make… soon!
Thanks for posting.
Great post! My mom and I made this a couple months ago for my nephew’s first birthday party, needless to say it disappeared quickly!