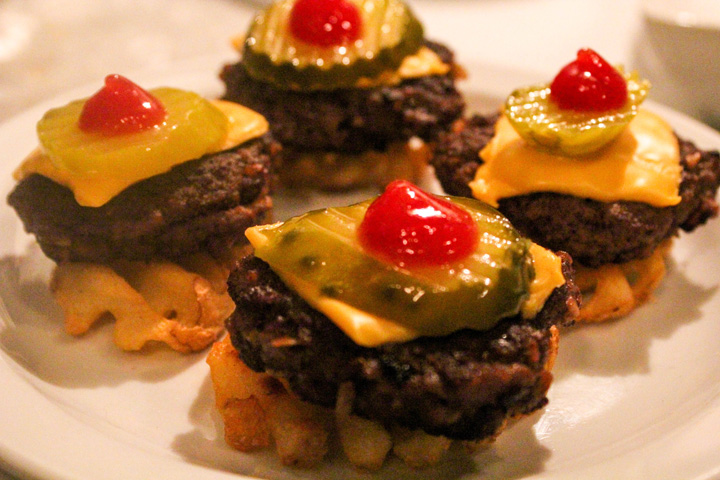
Craving classic comfort food? Look no further! This 5-ingredient mini cheeseburger and waffle fries meal delivers big flavor in bite-sized portions. Ground beef patties are seasoned and cooked and placed on top of crispy oven-baked waffle fries, all coming together for a satisfying and fuss-free feast. Customize your mini burgers with your favorite toppings and enjoy a fun and flavorful meal.
Why We Love These Mini Cheeseburgers and Waffle Fries
Here are some reasons why people will love these mini cheeseburgers on top of waffle fries:
- Double the deliciousness: This dish combines the classic flavors of a cheeseburger with the fun and textural excitement of waffle fries, offering a delightful combination in every bite.
- Perfect finger food: The mini size makes them ideal for parties, game nights, or even a quick and fun lunch or dinner. No utensils needed, just grab and enjoy!
- Kid-approved: The combination of familiar flavors and the playful presentation with waffle fries is sure to be a hit with children.
- Customizable: Feel free to personalize your mini cheeseburgers with your favorite toppings like ketchup, mustard, pickles, lettuce, tomato, and onions. You can even get creative with different cheeses or sauces.
- Portion control: The mini size allows for portion control, making it a more guilt-free way to indulge in your cheeseburger cravings.
- Fun and festive: The unique presentation with waffle fries adds a playful touch, making it a fun and festive dish for any occasion.
Storage Tips
While stacking mini cheeseburgers directly on top of fries isn’t the ideal method for long-term storage due to potential sogginess, here are some options for short periods if needed:
Short-term storage (up to 1 hour):
- Separate storage: Pack the mini cheeseburgers and fries in separate containers to prevent the fries from becoming soggy from burger grease or juices. If needed, place a layer of paper towels between the burgers to absorb excess moisture. Reassemble the burgers on top of the fries just before serving.
- Waxy paper or parchment paper: Wrap the burgers individually with wax paper or parchment paper to create a barrier between the burgers and fries, minimizing moisture transfer.
General storage tips:
- Cool completely: Allow both the burgers and fries to cool completely before storing.exclamation This helps prevent further condensation and sogginess.
- Refrigerator: If storing for longer, keep the burgers and fries in separate airtight containers in the refrigerator for up to 2-3 days. Reheat the burgers and fries separately before serving.
Alternative:
- Pack separately, assemble later: Consider packing the burger components (patties, cheese, toppings) and fries separately. This allows for easy assembly and customization when ready to eat, ensuring fresh and crispy fries.

Making the Recipe
Mini Cheeseburgers and Waffle Fries
Ingredients
- 16 waffle-cut fries frozen
- 1 pounds ground beef
- 1 teaspoon seasoning for burgers
- 4 slices cheddar cheese cut into quarters
- 4 cherry tomatoes sliced
- 4 hamburger pickle slices
- Condiments to enjoy with it: Ketchup Mustard, Mayonnaise, Sour Cream, Ranch Dressing, etc.
Instructions
- Preheat your oven to 400 degrees. Lightly spray a pan with cooking spray or you can use tin foil and line the pan. Place the Waffle Fries on the pan, not touching each other and spaced out nicely.
- Bake the fries for about 18-20 minutes. Remove and set aside.
- In a medium bowl, combine your seasoning and hamburger meat (we actually used the packets of onion soup mix… so good!) Form the meat into 16 mini patties.
- In a large skillet cook the burgers on the stove, uncovered, over medium-high heat for about 5 minutes. I cannot verify this, because we used our griddle to cook our burgers.
- Be sure and turn them once halfway through cooking. Drain the fat.
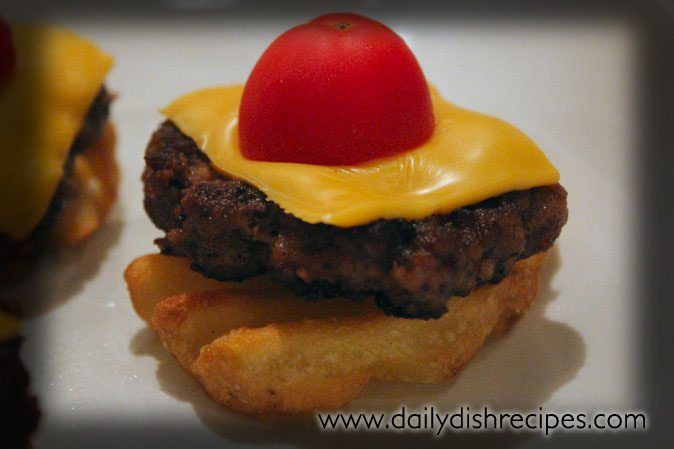
- Now, top each waffle fry with a burger, then some cheese, and then a tomato slice. (we also topped half with pickles!) Broil in your oven about 4 to 5 inches from heat for about 1 to 2 minutes or until the cheese has melted and the tomato browns (we did not brown the tomatoes).
- Serve with condiments. Makes 16 snacks.
How cute, I think my children will like these. I be they would be good at a party too. Thx for sharing.